Getting Started
What is SecBot?
SecBot is a web security scanner that has the capability of continuously testing the security of your web application. SecBot continuously performs user-defined and automated(coming soon) tests against your staging and production web application. The possibility of adding application specific test cases is a clear advantage of SecBot over generic vulnerability scanners.
For developers
If you are a developer you can think of SecBot as a continuous integration (CI) system for security. But unlike traditional CI systems that test the web application in a development environment, SecBot is also for testing security on actual staging and production servers.
Why should I care?
A web application should not only be developed securely, but it is also of great importance that the application is run securely in production. Imagine an application that is perfectly secure, but its NoSQL database becomes publicly accessible due to a configuration error later in production. Imagine an application that was configured with security in mind, but at some point in time a development switch is turned on in production and the web application starts leaking sensitive information.
Tutorial
Now let’s use SecBot for the first time!
In this tutorial we want to give you a very basic overview of SecBot. In the end, you will have set up a test project with one environment which is tested continuously.
Create an account and log in
This tutorial assumes that you already created and verified an account with SecBot, if not: Create an account.
Create a project
After logging in, go to the Security dashboard and click on Create Project. For now, only a project name is required. You can either choose the name of the web application you want to test, or if you just want to follow this tutorial, you can simply name it ‘Tutorial’. Click on Next to create your first project and continue with setting up an environment.
Add an environment
SecBot is built around the concept of environments with the idea that the staging and production server of a web application can be tested against the same test cases.
For this tutorial we choose ‘Staging’ as the name for the environment. For the host to test you can either choose your own or use our test host: http://test-az.sectests.net
Click on Create to create your first environment.
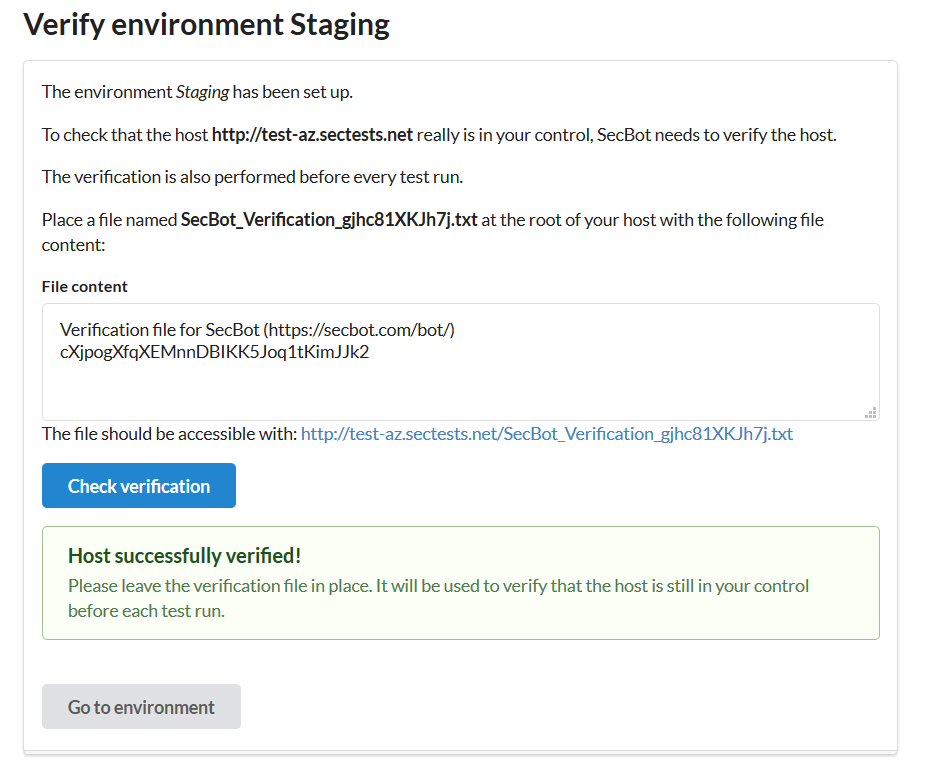
Verify the host of your environment
If you chose ‘http://test-az.sectests.net’ as host, you can skip the file upload and continue directly with ‘Check the verification’ as this special test host is already ‘pre-verified’ for all users.
Upload the verification file
To check that the host you entered really is in your control, SecBot needs to verify the host. To do this follow the instruction and upload the SecBot_Verification_*.txt with the file content given to the root path of your host.
Check the verification
Now you can click on Check Verification and a green text should appear that says ‘Host successfully verified!’ If you are having problems verifying your domain please contact our support.
It should look like this:
Add your first Test Case
Now go back to the Security dashboard, where you should see our newly added project and environment.
Below our environment click on Manage Test Cases (they are managed project-wide).
On the top there are two buttons. ‘Create Test Case’ creates an empty test case. But in this tutorial we go with a test case template that has everything set up for us. So click on Create Test Case from Template and select the Security Headers template.
Review the Test Case
We will now review the test case that the template proposes. If you are not interested in the structure and the details of this test case simply click ‘Create’.
The target of this test case is to check if the response of the given URL fragment has some common security headers set.
General Information
On top of the test case we have a general part that can be filled with information about the test case, namely:
- a Name (give a meaningful name so that it’s easier to analyze the failed tests).
- a Description (e.g. with reference to an RFC) or
- a Doc/Issue Link where you can link to your company’s internal or external issue tracker or Wiki.
Given Request
The second part of the test case is the given part of the actual HTTP request performed by the test case:
- the Given URL Fragment where you specify which URL should be tested (in case of the host http://test-az.sectests.net, ‘/’ simply means http://test-az.sectests.net/)
- the Given HTTP Method (typically GET; OPTIONS, HEAD and TRACE are also supported, others will follow)
In this template the root path (/) is tested with the HTTP method set to GET.
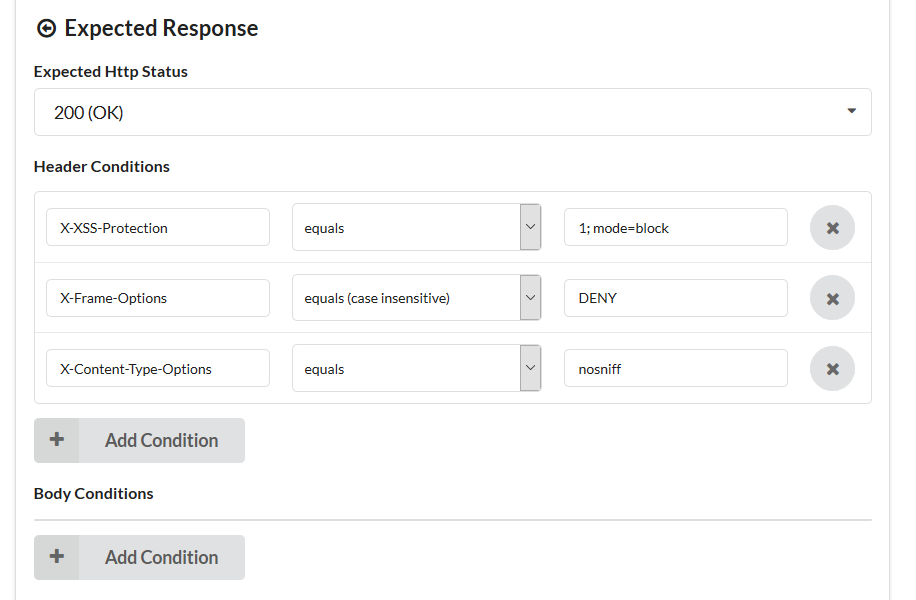
Expected Response
The third part of the test case contains the assumptions about the response:
- the Expected HTTP Status (typically tested for: 200 (OK), 404 (Not Found), 400 (Bad Request), 403 (Forbidden))
- the Header Conditions where the HTTP headers returned from the server can be tested.
- the Body Conditions where the returned body can be tested.
In this template the HTTP Status returned is expected to be 200 (OK) and the following common security headers are tested:
- X-XSS-Protection tested for value ‘1; mode=block’: this configuration blocks reflected cross-site scripting (XSS) attacks in some browsers
- X-Frame-Options tested for value ‘DENY’: this configuration blocks a browser from embedding a page in a frame, mainly to prevent clickjacking attacks.
- X-Content-Type-Options tested for value ‘nosniff’: this configuration tells the browser not to guess the content types of resources.
In this template we don’t test the content.
Create the Test Case
Now save the test case by clicking on Create.
Start a Test Run
Now let’s start our first run! To do that go back to the Security dashboard and click on our ‘Staging’ environment. In the appearing environment overview click on Start Test Run.
Now wait for a bit and refresh the page. If you used our test host you should now see a green check mark with the note that ‘all tests passed’.
Congratulations!

Set up the environment to run continuously
If you want to run the test suite continuously (say daily, weekly or monthly) you can do this by clicking on Configure Environment and select a schedule to run. If a test run fails you will be alerted by email.